Post
How to Make Natural Handmade Soap at Home (Beginner Guide)
May
Introduction
Handmade soap is becoming very popular because people prefer natural, chemical-free skincare products. Making soap at home is not only fun but also allows you to control the ingredients you use.
In this guide, you will learn how to make natural handmade soap step by step in a simple way for beginners.
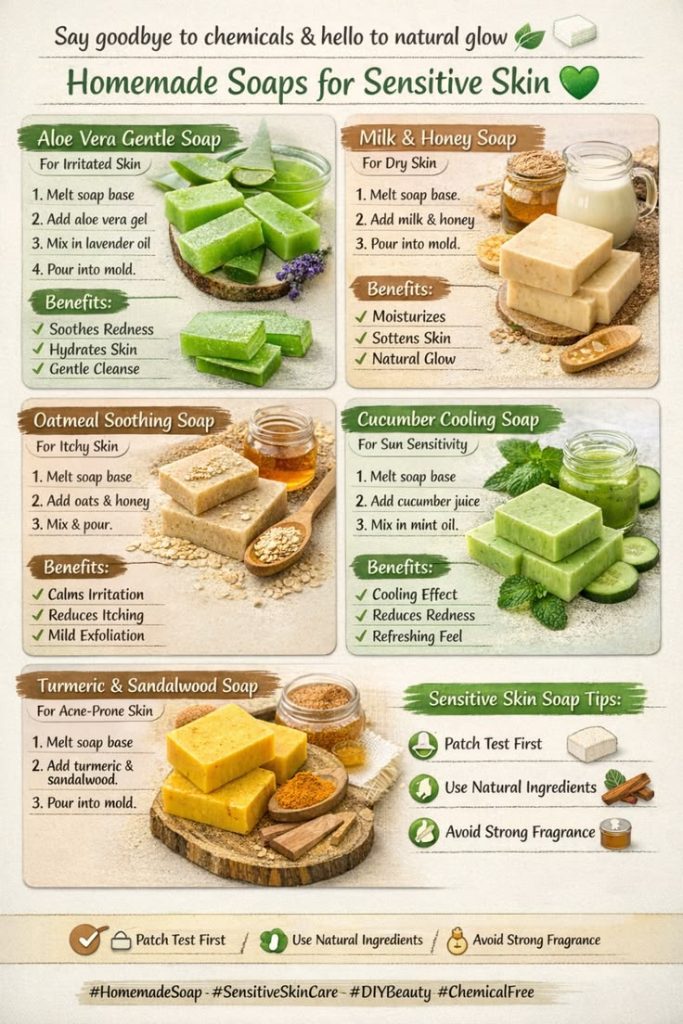
Ingredients Needed
- Soap base (glycerin or melt-and-pour base)
- Essential oils (lavender, tea tree, lemon, etc.)
- Natural color (optional)
- Soap molds
- Dried flowers or herbs (optional)

:max_bytes(150000):strip_icc()/SPR_517084-how-to-make-soap-5acf73dfc6733500372cbb73.png)
Step 1: Melt the Soap Base
Cut the soap base into small pieces and melt it using a double boiler or microwave until it becomes liquid.
Step 2: Add Essential Oils
Add a few drops of essential oils to give your soap a natural fragrance.
Step 3: Add Color and Decorations
You can add natural color or dried flowers to make the soap more beautiful.
Step 4: Pour into Molds
Carefully pour the mixture into soap molds. Make sure there are no air bubbles.
Step 5: Let It Harden
Leave the soap for a few hours until it becomes solid and firm.
Step 6: Remove and Use
Take the soap out of the mold and it is ready to use or gift.
Benefits of Handmade Soap
- Free from harmful chemicals
- Safe for skin
- Eco-friendly
- Can be customized
- Great handmade gift idea
Conclusion
Making handmade soap at home is simple, fun, and healthy. It allows you to create natural skincare products that are safe and personalized.
Introduction
Handmade soap is becoming very popular because people prefer natural, chemical-free skincare products. Making soap at home is not only fun but also allows you to control the ingredients you use.
In this guide, you will learn how to make natural handmade soap step by step in a simple way for beginners.
Ingredients Needed
- Soap base (glycerin or melt-and-pour base)
- Essential oils (lavender, tea tree, lemon, etc.)
- Natural color (optional)
- Soap molds
- Dried flowers or herbs (optional)
Step 1: Melt the Soap Base
Cut the soap base into small pieces and melt it using a double boiler or microwave until it becomes liquid.
Step 2: Add Essential Oils
Add a few drops of essential oils to give your soap a natural fragrance.
Step 3: Add Color and Decorations
You can add natural color or dried flowers to make the soap more beautiful.
Step 4: Pour into Molds
Carefully pour the mixture into soap molds. Make sure there are no air bubbles.
Step 5: Let It Harden
Leave the soap for a few hours until it becomes solid and firm.
Step 6: Remove and Use
Take the soap out of the mold and it is ready to use or gift.
Benefits of Handmade Soap
- Free from harmful chemicals
- Safe for skin
- Eco-friendly
- Can be customized
- Great handmade gift idea
Conclusion
Making handmade soap at home is simple, fun, and healthy. It allows you to create natural skincare products that are safe and personalized.